Wind & Wet

Online airfoil plotter

How to produce a full size airfoil drawing on multiple pages

I have had a number of queries as to how to print out a large copies of the airfoil sections using the online airfoil plotter. If you click on the "Open full size print image in a new window" link a new window will pop up with the full size print out. Unfortunately, if the drawing is larger than the page, the browser will just truncate the drawing. Ideally the browser would split the drawing onto multiple pages.
To print out the airfoil image on multiple pages I've added the page width and height to the plotter form. If you click on the "Open multi page image in a new window" link a new window will pop up with the airfoil image divided into page size sections. The image looks a bit disjointed as there are no margins or formatting, but if you look at this in the browser print preview mode it is a lot clearer. If the images fits the paper there should be four red corner marks visible. Setting the margins to zero, the scale to 100% and the landscape/portrait mode may be required.
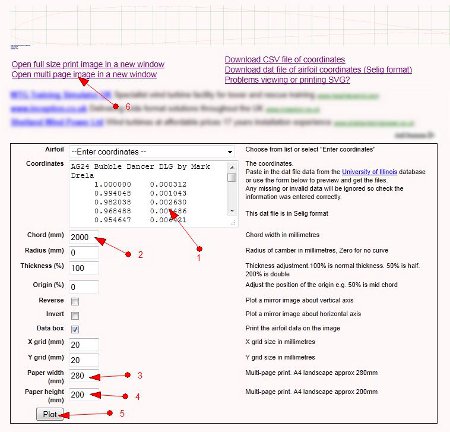
Online airfoil plotter in browser
The following is an example of how you can print a large airfoil on multiple pages and then assemble it into a full size drawing. I've used the Firefox browser as I find it the easiest to use and produces the best result. The example image is a 2 metre chord AG24 airfoil section printed on 8 sheets of A4 paper using an Epson 4050 printer. The larger the printer the better and if you have access to a printer with continuous paper it may be possible to print the drawing in a long strip, but I haven't tried this.
  1. Bring up the online airfoil plotter page and select the airfoil you require, either from the drop down menu or enter the coordinates from the ".dat" file.
  2. Enter the chord width of the final plot.
  3. Enter the paper width of your printer. This will vary depending if you are using the page landscape or portrait
  4. Enter the paper height of your printer.
  5. Press the plot button to generate the image.
  6. Click on the "Open multi page image in a new window" link. A new window will pop up with the image. You might need to authorize this in the browser if pop-up windows are blocked.
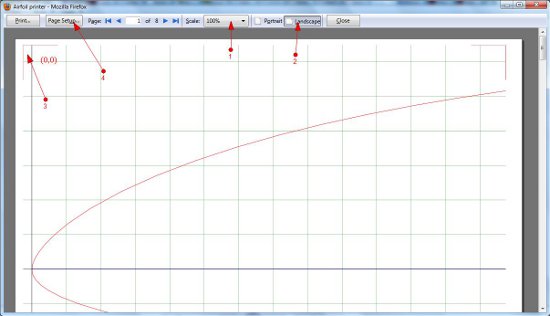
Airfoil image in browser
  1. Select the print preview screen on the browser window and it should look like the example above. Check the scale is 100%.
  2. Check the landscape / portrait setting is correct.
  3. Check there is a red corner mark on all 4 corners. This means the image is going to fit on the page. The bottom corners are not visible in the example above.
  4. Adjust the margin sizes to the minimum and switch off any additional options if the corners are not showing. if this doesn't work you may have to go back to the airfoil plotter page, change the page width and height and re-plot the image.
  5. As you scroll down you should see each section of the airfoil on a new page. The red numbers in the corner of the image are the X and Y coordinates of the page. When everything looks OK send the complete image to the printer.
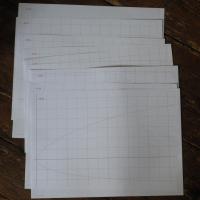
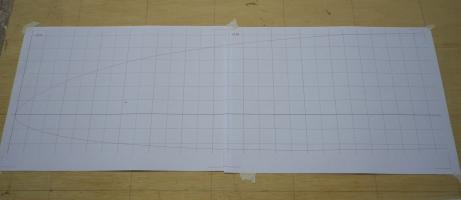
Airfoil section printed Airfoil section assembled
  1. You should get a set of pages off the printer similar to the picture above. Do check that the grid is the correct size as some browsers will result in a slightly smaller or larger size.
  2. The pages can now be assembled into a full size drawing. If there are more than a couple of pages I would suggest they are laid out on a board with a grid drawn on it so there is no accumulated error as the pages are fixed together. I used the same board I had used for the dinghy plan which had a 10cm grid marked out. I find it useful to cut away the edges of one sheet so the page corner marks can be accurately aligned.
  3. The end result is below, although the outline of the airfoil section is barely visible. If the drawing was going to be used as a template it would probably need to be glued to a piece of board to stop the paper stretching or distorting.
Airfoil section assembled

I do not warrant the correctness of this content. The risk from using it lies entirely with the user. While using this site, you agree to have read and accepted the terms of use. Copyright © 2024. All Rights Reserved. Privacy policy